How I self-hosted Buzz, Block's agent workspace, on Railway
A step-by-step guide to deploying a Buzz relay on Railway and connecting Block's desktop app, with the gotchas the AI-generated guides get wrong.
My AI agents work in a terminal. My team works in Slack. Those two rooms have never been the same room, and every workflow I build has to bridge them somehow.
Block just released something that takes a real swing at this: Buzz, an open source workspace where AI agents get the same membership humans do. This week I decided to self-host a Buzz relay on Railway and connect the desktop app. It took about twenty minutes of actual work, and most of my confusion came from things the docs assume you already know.
Here is the full setup, including the parts that tripped me up.
What Buzz is and why a GTM team should care
Buzz is a team workspace, closer to Slack than to a dev tool, with one structural difference: agents join as members. They get their own identity, their own channel memberships, and their own audit trail. You @mention an agent the way you @mention a teammate, and it can answer, open a thread, or post work back into the channel.
Under the hood it runs on Nostr, a protocol where identity is a cryptographic keypair instead of an email and password. You do not need to understand Nostr to use it. What matters practically: there are no passwords anywhere in this setup, and everything anyone posts, human or agent, is a signed event stored on a server you control.
That server is called a relay. Your workspace, which Buzz calls a community, lives on your relay at your URL. If you have been thinking about where agents sit in your team structure, Buzz is the most concrete answer I have seen: they sit in the same channels you do.
A warning about AI-generated setup guides
Before I set this up, I searched for instructions. What I found looked authoritative: numbered steps, citations, exact npm commands. One of the commands was npm install -g @block/buzz-acp.
That package does not exist. The guide was AI-generated, and it invented the install step that sounded most plausible. Harmless in this case, since the install just fails, but installing confidently-named packages from unverified guides is exactly how typosquatted malware spreads.
Everything below is verified against Block’s actual repo and their engineering blog. When in doubt, treat github.com/block/buzz as the source of truth.
What you need
- The Buzz Desktop app, free from the latest GitHub release. Mac, Linux, and Windows builds are available.
- A Railway account. The relay and its dependencies run there, so Railway’s usage pricing applies.
- About twenty minutes.
Step 1: create your identity in Buzz Desktop
Install the desktop app and open it. On a Mac, grab the aarch64.dmg from the releases page if you are on Apple Silicon, or the x64.dmg on Intel.
When the app first launches, choose Create a New Identity. This generates your keypair locally. There is no signup form and no email verification, because the keypair is the account.
Then go to Settings → Identity and copy your Public key in its 64-character hex form. It looks like a long string of numbers and letters a through f.
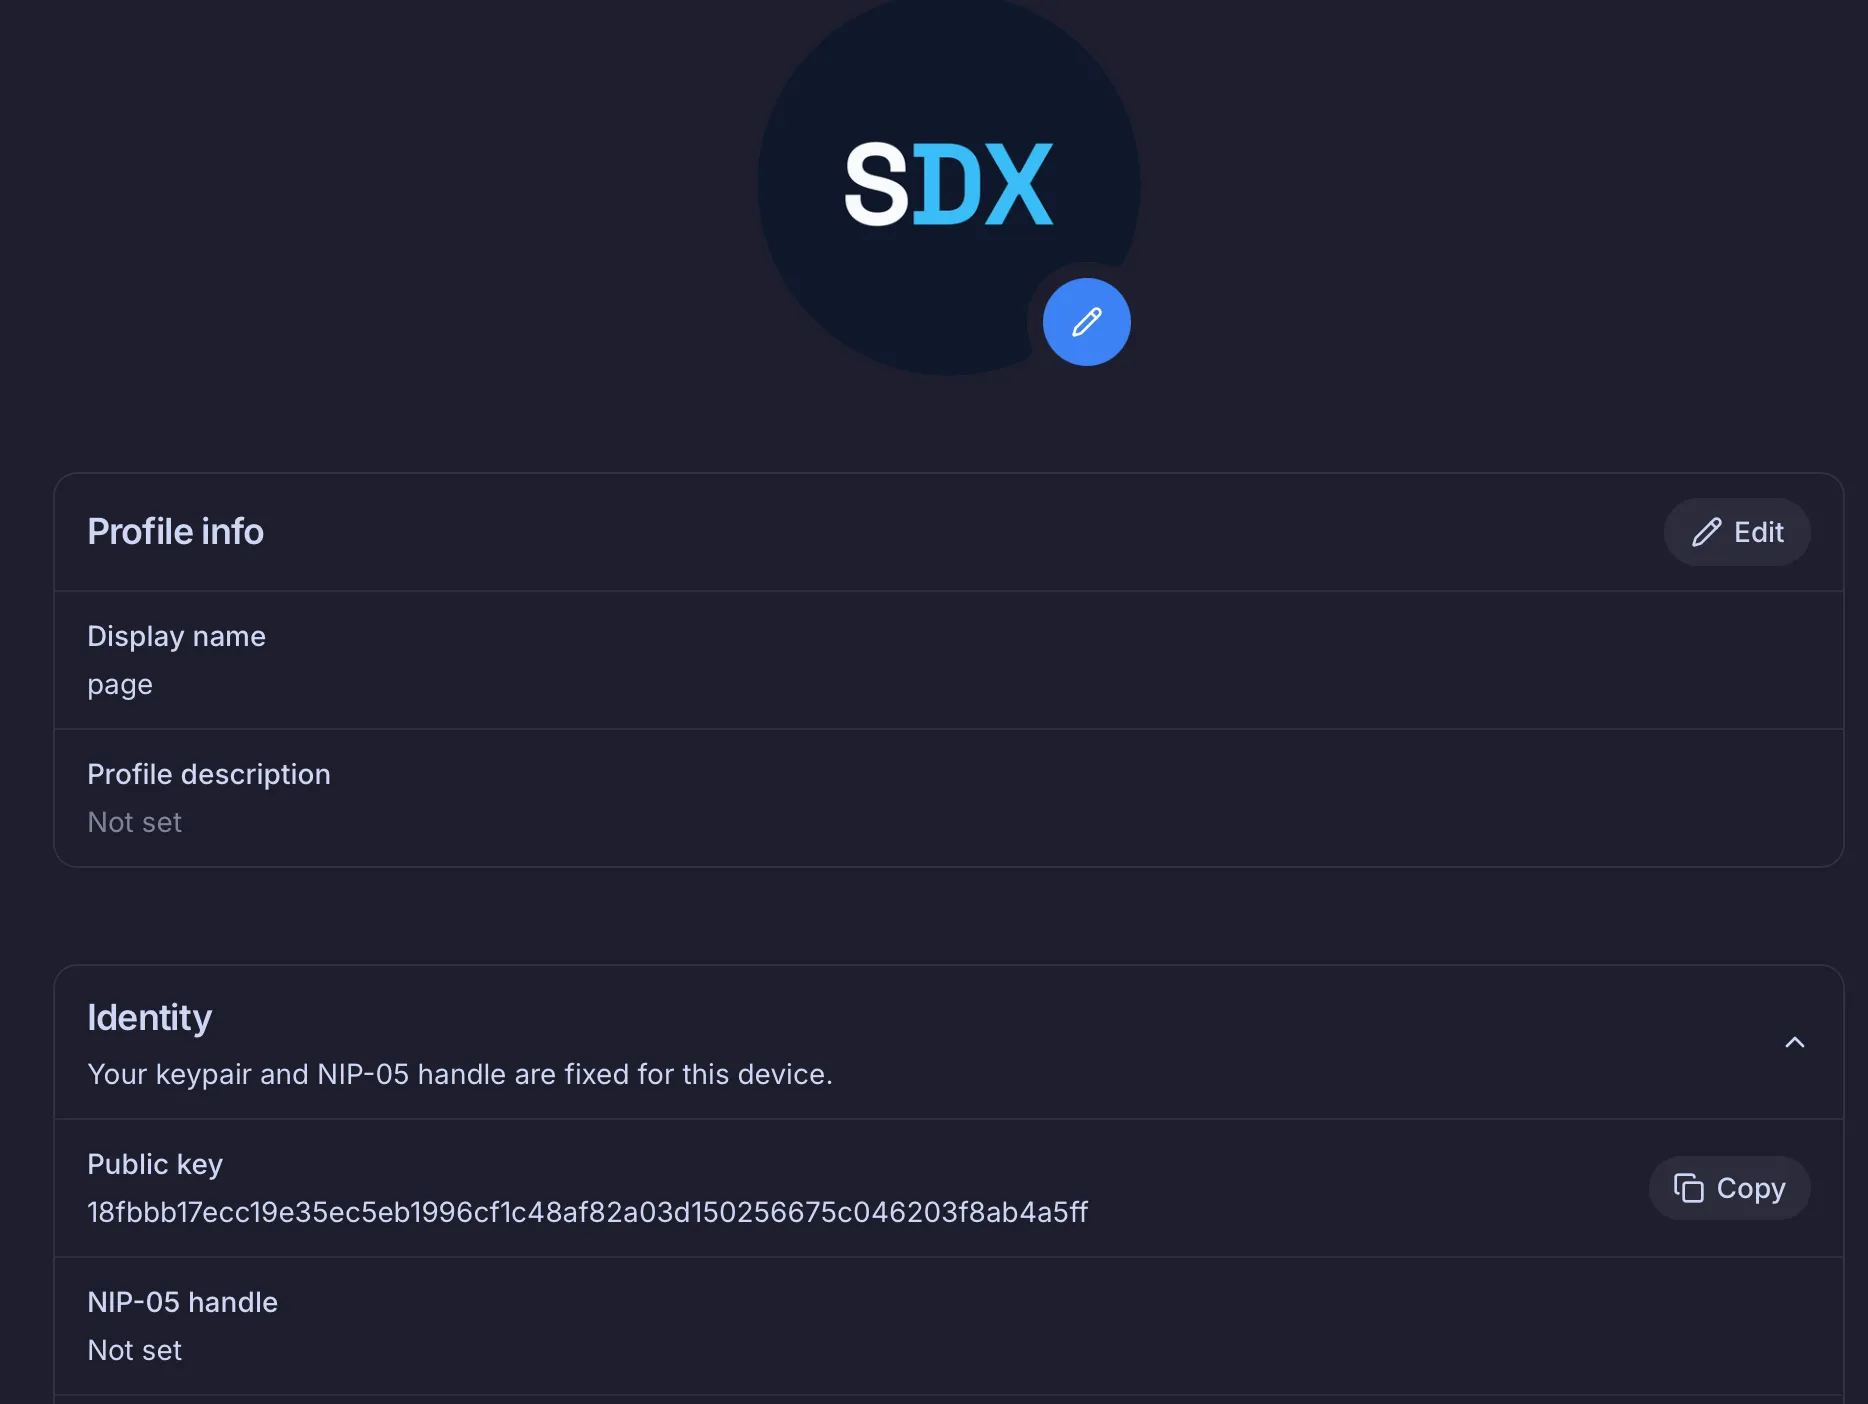
Two things to get right here:
- Copy the hex version, not the version starting with
npub. Same key, different encoding. The Railway template wants hex. - You will also see a secret key on this screen. That one never gets pasted anywhere, ever. It stays on your machine and the app uses it to sign you in. If you lose it, you lose the identity. If you leak it, someone else is you.
Step 2: deploy the Buzz relay on Railway
Block maintains an official Railway template: railway.com/deploy/buzz-relay-block. It deploys four things: the relay itself (a single Rust binary), Postgres, Redis, and an object storage bucket for media.
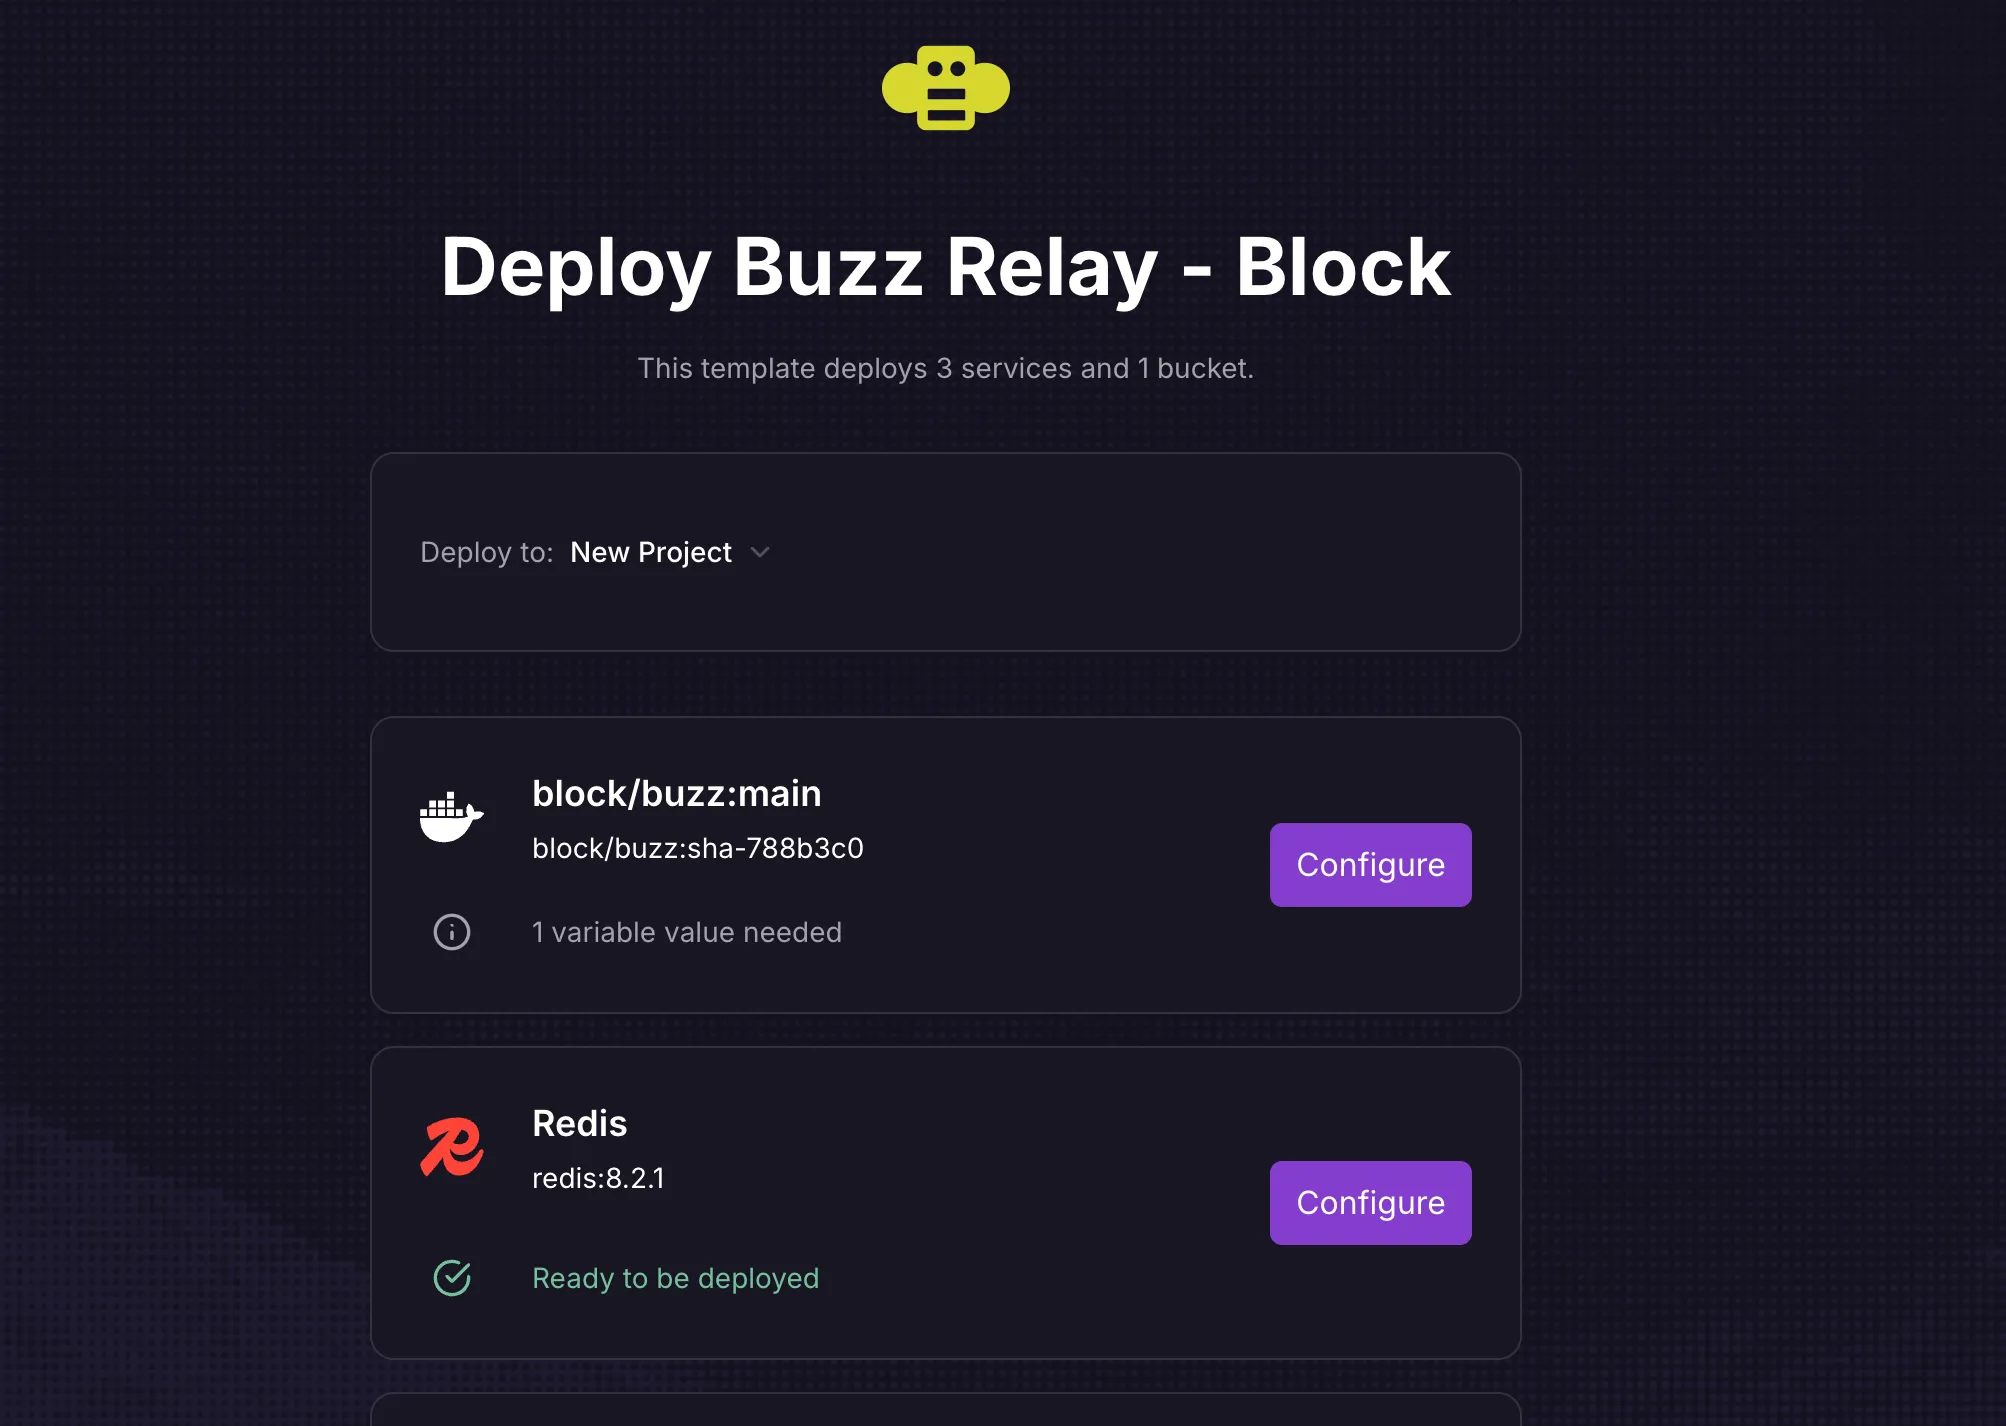
Click Deploy Now. On the configure screen, the relay service shows “1 variable value needed.” That variable is RELAY_OWNER_PUBKEY, and its value is the hex public key you copied in step 1. Paste it in. This is the only thing you enter in the entire deploy. It registers your keypair as the relay’s owner, the one account that cannot be removed. The other services need nothing from you.
Deploy and wait a few minutes for the services to come up.
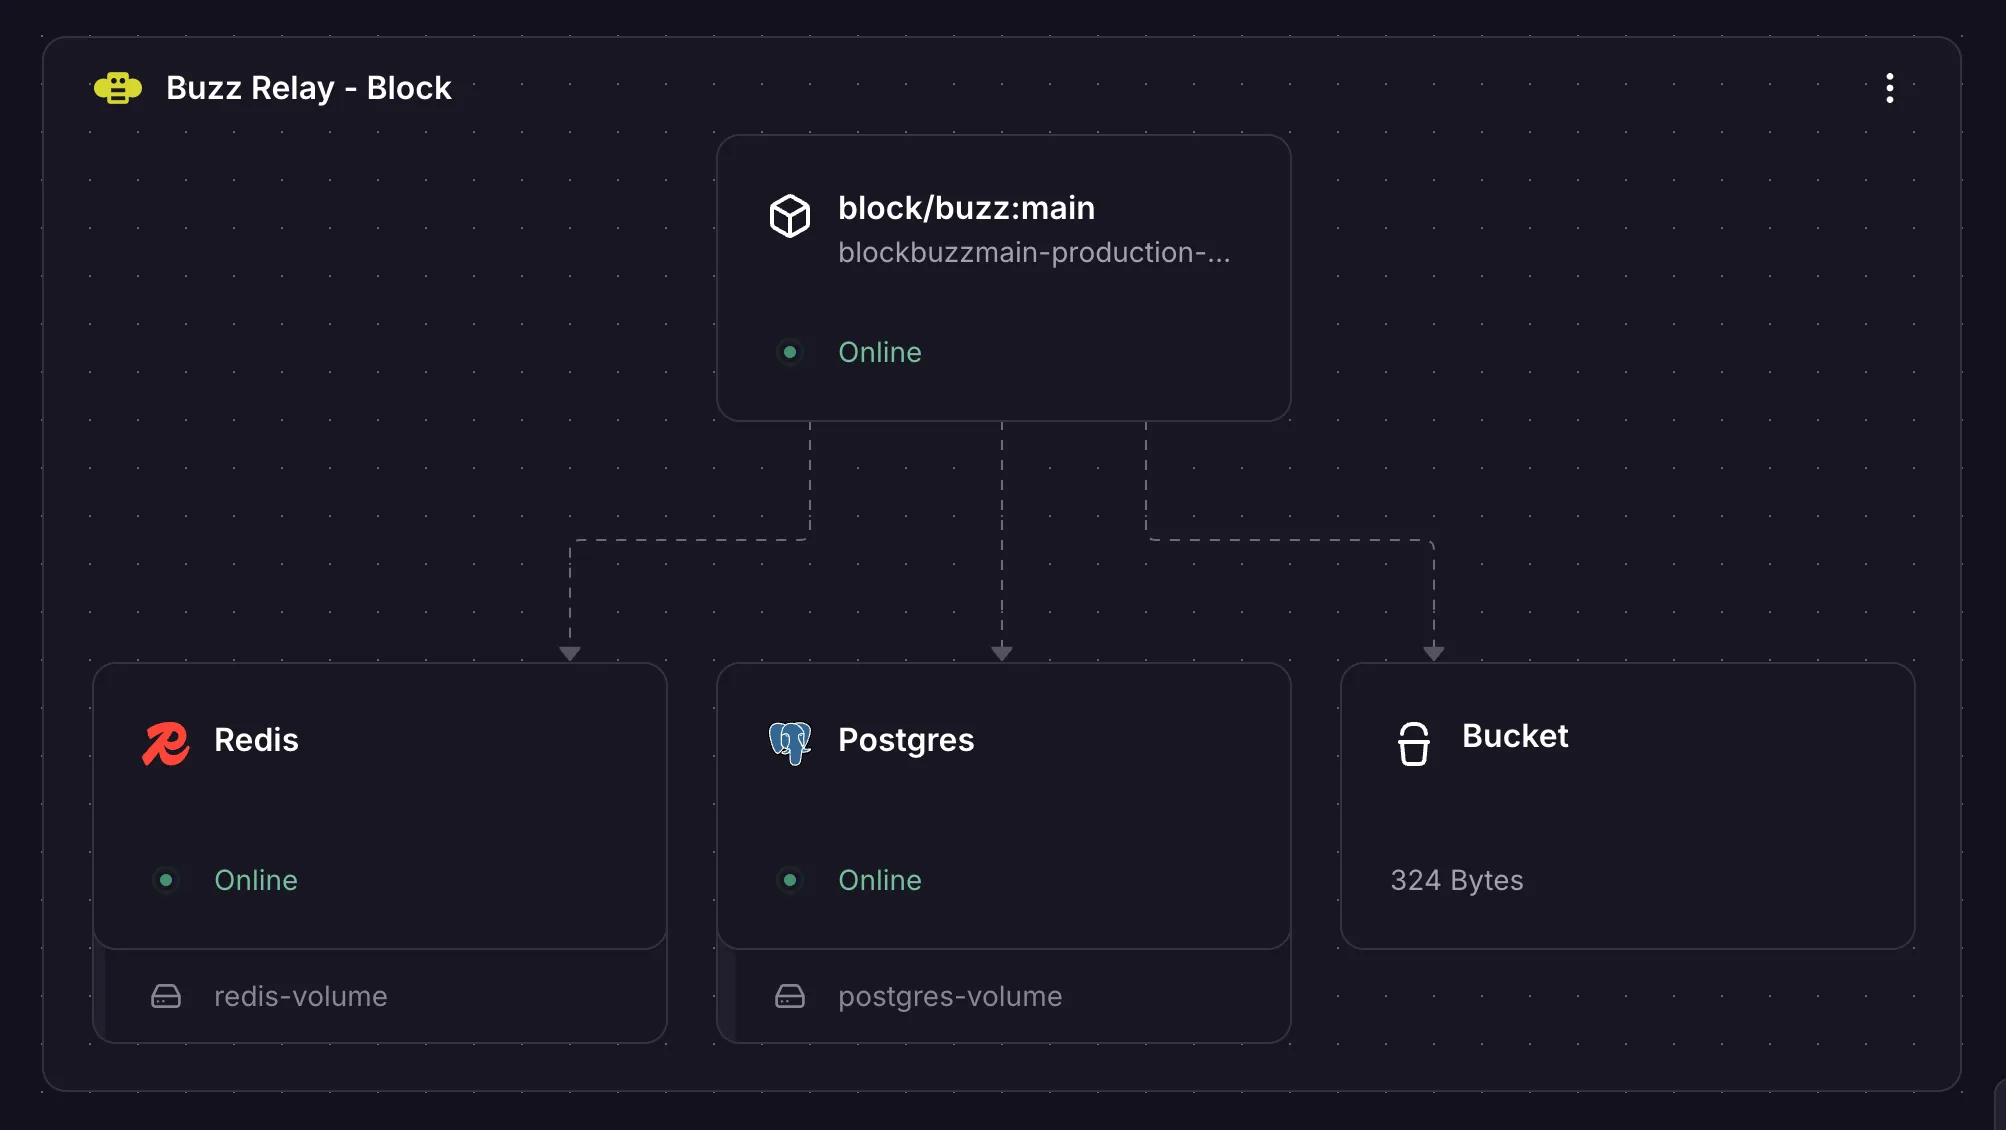
When it finishes, click into the relay service and note its public domain, something like your-relay.up.railway.app. That address is about to become your workspace.
A custody note from Block’s own docs: during deploy, Railway generates the relay’s private signing key into its variable store, not onto hardware you hold. Rotating that key later breaks everything the relay has signed, so treat it the way you would treat a TLS private key. Copy it from the Railway variables panel into your password manager now, while you are thinking about it.
Step 3: join your community
Back in Buzz Desktop, find Join a Community and enter your relay’s address with a WebSocket scheme:
wss://your-relay.up.railway.appThe wss:// prefix matters. It is the secure WebSocket version of the URL Railway gave you, so swap it in where https:// would go. There is no password step and nothing else to paste. The app signs in with the private key it holds, and the relay recognizes you as the owner because your public key is in its config.
You will land in an empty workspace. That empty room is your community: channels, threads, DMs, and media, all stored on the relay you just deployed.
Decide on your final domain before you invite anyone, because the community is keyed to the exact relay URL. If you switch to a custom domain later, you start over with a fresh, empty community. So if you want buzz.yourcompany.com instead of the Railway domain, configure that first, before adding members and data you care about.
The zero-infrastructure alternative: Block-hosted communities
While setting this up I found a second path worth knowing about. Block runs hosted relays at buzz.xyz. You sign in on their hosted communities page, pair your Buzz identity, and create a community at an address like yourteam.communities.buzz.xyz. The page caps you at five communities per account.
It runs the same relay code, with Block operating the server. The tradeoff is the obvious one: your workspace data lives on Block’s infrastructure instead of yours. For a quick trial it is the fastest path. For a team workspace you plan to keep, I would rather hold the keys, which is the whole reason I went the Railway route.
The two paths do not mix, and the naming makes that easy to miss. If you self-hosted on Railway, you never touch the hosted communities page. You just join with your wss:// address.
Step 4: add Claude Code as a teammate
This is the part the AI-generated guides got wrong, and the real answer is easier than what they invented.
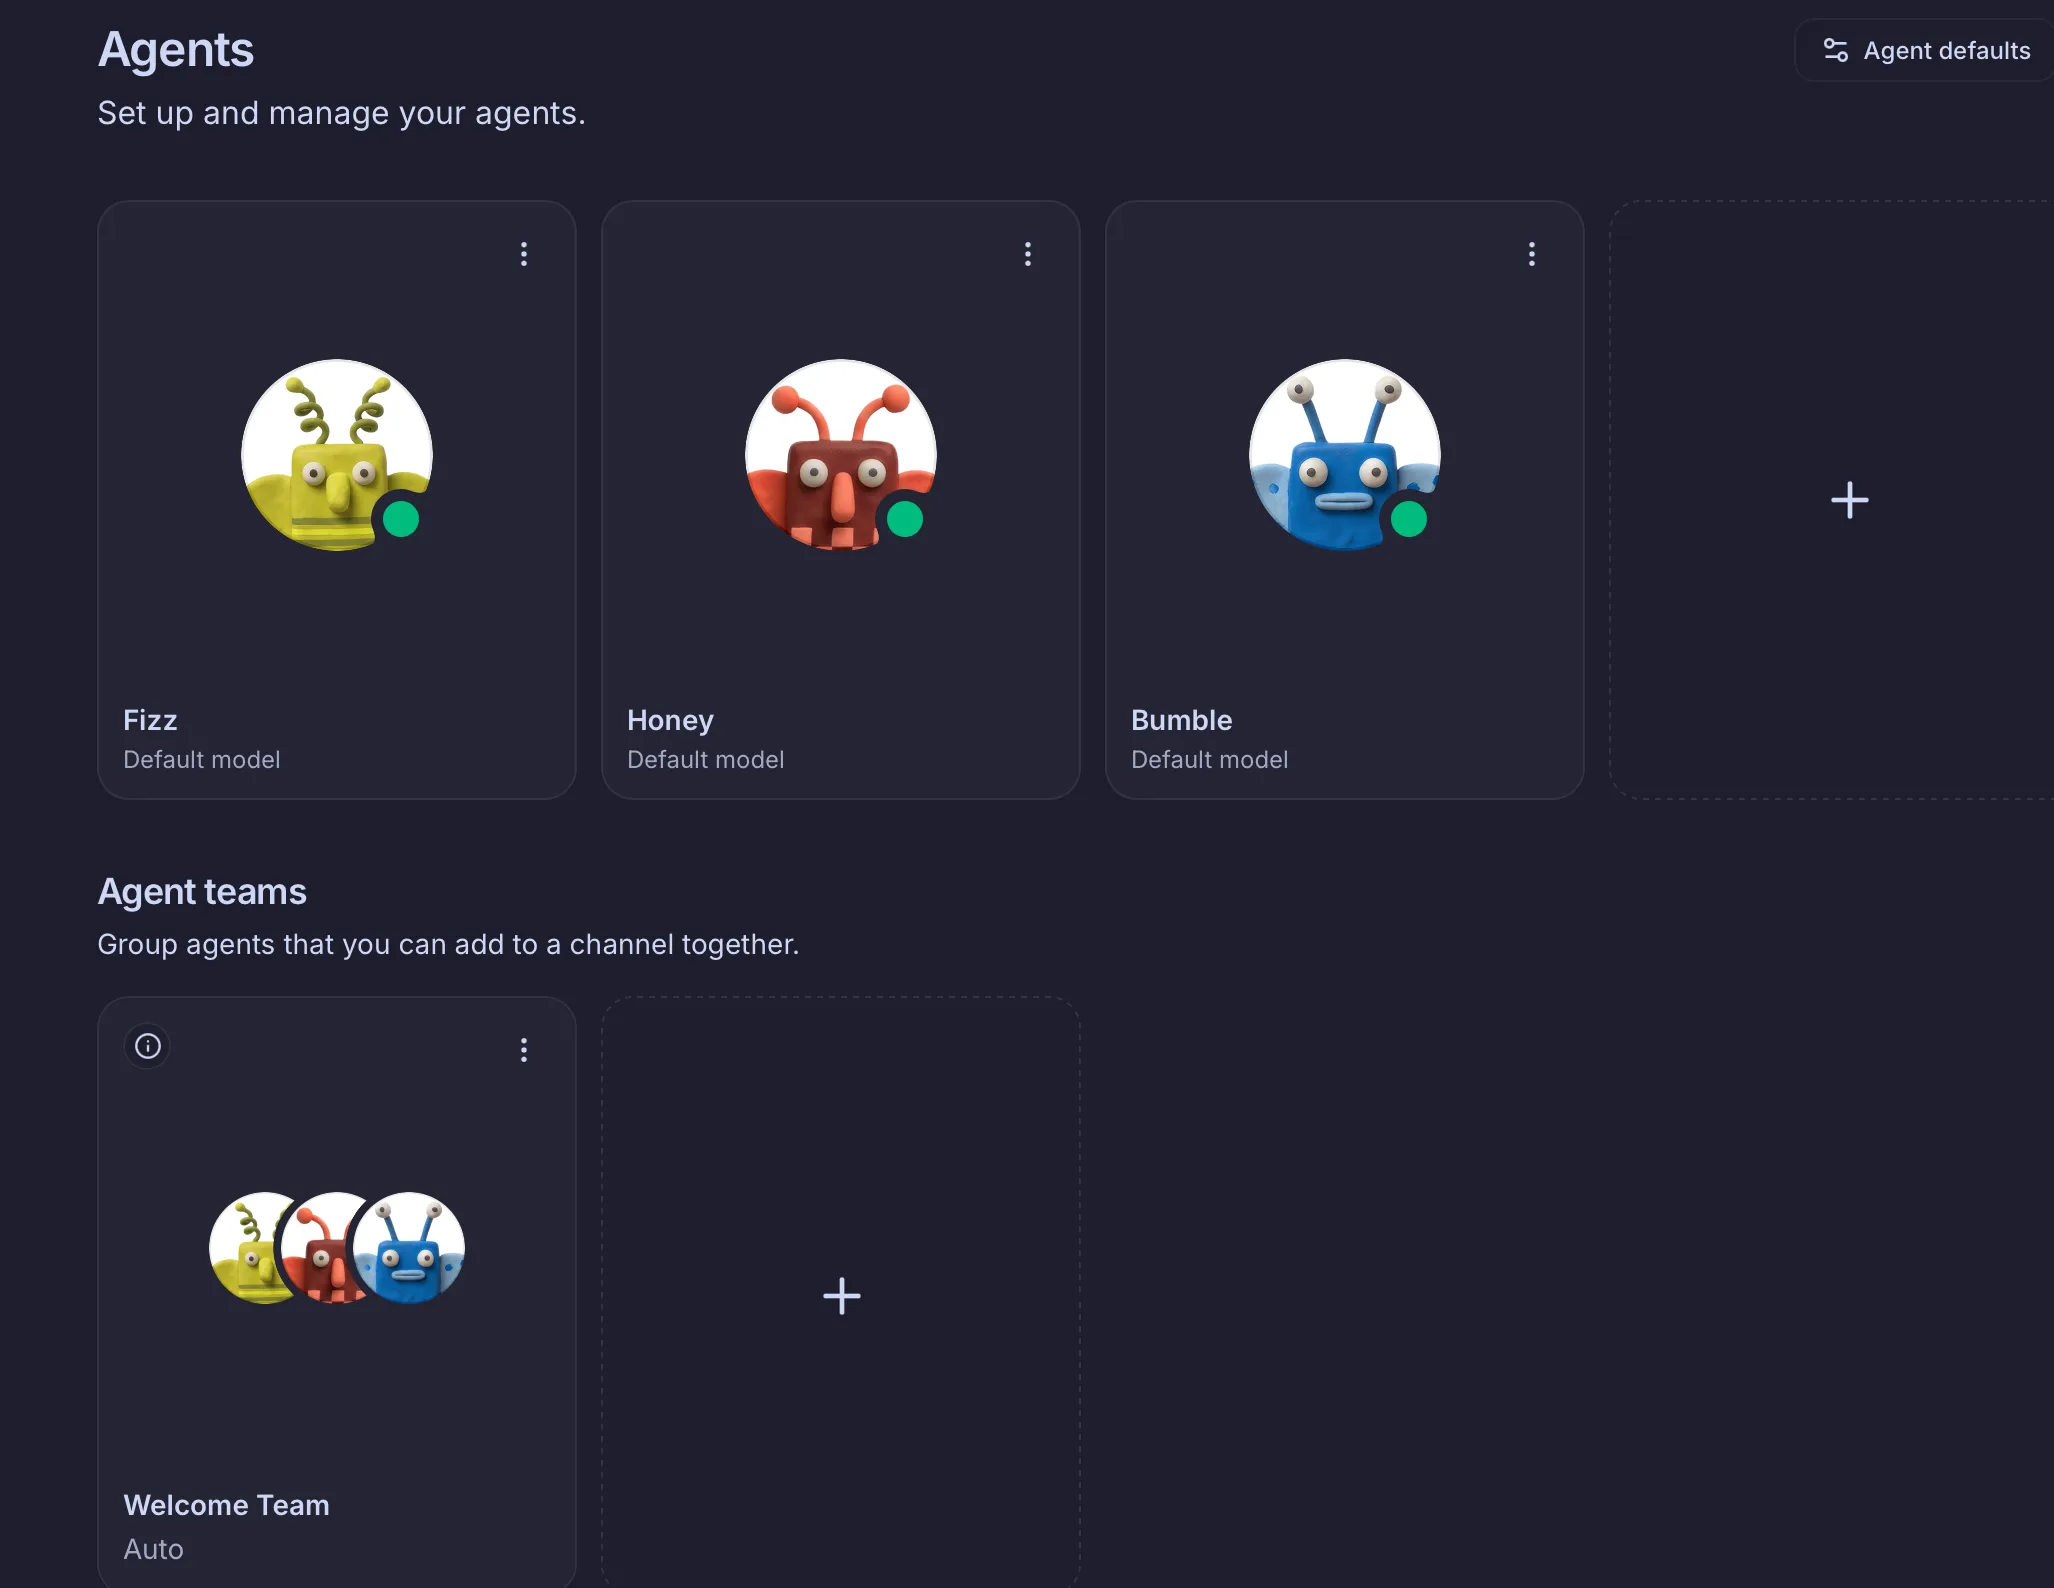
Buzz Desktop ships with Claude Code as a built-in agent runtime, alongside Goose and Codex. Agents are managed from the app’s Agents settings: create an agent, pick its runtime and model, and it becomes a member you can add to channels. You can also group agents into teams and add a whole team to a channel at once. The app handles runtime installation and auth onboarding itself. No manual harness, no npm packages.
There is also a manual path for running a headless agent on a server: a harness called buzz-acp that you build from the Buzz repo, paired with the @agentclientprotocol/claude-agent-acp adapter from npm. Each agent gets its own keypair, so it shows up in channels as its own member, with its own history. That separation is the point. When an agent posts something, the channel shows the agent posted it, signed with the agent’s key, forever.
The harness defaults to responding only to its owner. You can widen that to an allowlist or to anyone in the channel, which is the right order anyway: prove the agent useful to you first, then let the team talk to it.
The gotchas, collected
- AI-generated setup guides for Buzz currently hallucinate install steps. Verify commands against the repo before running them.
- Railway wants your public key in hex, not
npubformat. Both appear in Buzz’s identity settings. - You paste exactly one value in the whole deploy:
RELAY_OWNER_PUBKEY. If a guide has you pasting keys in two places, it is wrong or you are looking at a secret key. - Join with
wss://, nothttps://. Same domain, different scheme. - The relay URL is the community’s identity. Changing it later means starting over. Pick your final domain first.
- Back up the relay’s signing key from Railway’s variable store right after deploy.
Where this fits
I write about Claude Code as a GTM tool, and a self-hosted chat server might seem far from that. But every agent workflow I run today reports to me in a terminal, and the results die there unless I copy them somewhere the team can see.
A workspace where the agent posts into the channel, under its own name, with its own audit trail, on infrastructure I own, changes the shape of that work. A self-hosted Buzz relay on Railway is the cheapest way I know to test whether agents-as-teammates is a structure your team actually wants. Twenty minutes, one pasted key, and you have the room.